
If you are looking for a fluffy, delicate milk bread bun with a super tender crumb and rich flavor, this is the recipe you need.
These rolls are made with a dough enriched with milk, eggs, butter and a touch of sugar, which makes them super soft and delicious. In this article I share information so that when making these breads you get the best possible result and enjoy them one hundred percent.
Details to be considered
Often when I share bread recipes, the most important thing for me is to talk about the flour. It seems incredible, but this ingredient is so delicate that there are many factors that influence it so that we can use it properly in our recipes.
For this milk bread recipe, I have used wheat flour with 12% protein. Now, there are flours with 12% protein that are marketed as all-purpose flours, and there are those that are special for making bread. The difference is usually that an all-purpose flour may contain a mix of hard and soft wheat grains and the total amount of protein is then usually an approximation of those mixes. On the other hand, a flour for baking bread (or a bread flour) generally contains hard wheat, which is the one that, having more protein, generates more gluten (there may be some exceptions).
I have used an all-purpose flour for this bread, but I recommend that if you have access to bread flour, use it instead of all-purpose, especially if you do not handle dough very often. Bread flours can have even more protein than 12% and this tells us, among other things, that the flour absorbs more liquid and will create a more elastic gluten network that will ultimately be noticeable in the crumb and the aroma of the bread
With the 12% all-purpose flour you get a delicious bread as well, the problem is that it may not absorb liquids as efficiently as bread flour and it becomes more difficult to handle, sometimes making it necessary to add additional flour to the dough, your hands or the work table to be able to shape the rolls or buns. The risk of adding more flour is that you can upset and damage the correct proportion of the ingredients and it is possible that the breads end up hard and dry instead of fluffy and tender. My recommendation is, if you use a flour like mine (all purpose), use tools like a spatula or scraper to move the dough on the work surface and try to round the dough without having to add more flour. You can lightly oil your hands, half a teaspoon of vegetable oil for example, so that this fat helps to keep the dough from sticking too much to your hands while you get used to the texture it has and wait for it to become elastic, especially if you are kneading it by hand.
Then, in addition to using the right flour, it is also important to make sure that the other ingredients are also the right ones, or rather, that they are at the ideal temperature to use them.
I have made these milk rolls with granulated active dry yeast. It is baker’s yeast and is not the same as baking powder or baking soda. Bread yeast are natural microorganisms that are activated by liquids and feed off the ingredients of the dough. During that process, they release gases that ideally get trapped in the gluten network created by the wheat flour, ultimately giving us the delicious bread, we want to eat. It is possible to use other types of yeast, such as instant dry yeast or fresh yeast. Neither is baking powder; this ingredient does not work the same to make bread. Fresh yeast is usually sold refrigerated, has a shorter shelf life and is less concentrated, so you need to triple the amount in comparison with the dry yeast used. Instant dry yeast can be substituted one to one, and the main difference is that it does not need to be activated before using it in the recipe, and instead it is directly mixed with the flour and other ingredients and then kneaded.
I prefer to use dry yeast and activate it beforehand to make sure it’s still alive before making the whole dough, so I don’t lose ingredients. Also, if I mistakenly use too hot water or milk, I lose only those first few ingredients instead of potentially losing all the dough and realizing it only after I let it sit and then see that it has not risen at all.
This brings me to the point of the rest of the ingredients in the recipe. It is important that the milk and water used initially to activate the yeast are warm but not hot. If they are too hot, they will simply damage the yeast and the bread will not rise. Also, the egg and butter should be at room temperature. Butter at a soft and spreadable consistency but not completely melted.
I used a medium sized egg, I buy it as a size M, and that corresponds to an egg that weighs 50g without the shell. If you can weigh the ingredients instead of measuring by cups, you can make sure you’re using the right size egg for the amount of liquid the recipe calls for.
Salt corresponds to a teaspoon and a half or 11g. The sugar used is 50g and it does not make the rolls sweet, it gives them a touch of flavor and is extra food for the yeast. If you want, you can omit it or use less quantity.
After the dough is made, the next aspect to take care of is allowing it to rest long enough. The idea is that we can notice a significant increase in its size, since this tells us that the yeast is doing its job. Generally, in places with temperatures between 25 and 30 degrees Celsius (77 to 86°F), this process can take approximately one hour. In colder places, as in my case, it can last longer, and it is important to be patient. If the dough does not rest properly, the bread will not rise when baked and will be hard and dry.
In addition to letting it rest long enough to notice the growth of the dough, another way to know that it has risen enough is to gently press the dough with your fingertips (especially after the second rest) and if the dough returns slowly and not completely it has had enough proofing time. If it springs back immediately it lacks proofing, and if the finger remains marked in the dough, it is over proofed. It’s a matter of practice to get to know our dough and find the right amount of time they need in our home environment.
I recommend portioning the dough so that all the buns are the same size. Whether you do it by eye or with a kitchen scale, this detail is important so that all the buns or bread rolls are cooked in the same amount of time.
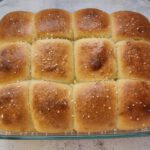
As for baking, I have baked them for 22 minutes at 170°C or 338°F. This time is just a guide and depends on each oven and also on the material of the baking dish where we bake them. Basically, we are looking for the buns to have risen and to be golden brown on top. Another way to be sure is to gently pat them on the top when you take them out of the oven, and if they are cooked through, they should sound hollow.
And now, the recipe on video and in writing
Dinner Rolls - super fluffy and delicious
Ingredients
- 190 ml Warm milk (¾ Cup)
- 125 ml Warm water (½ Cup)
- 50 g Sugar (¼ Cup)
- 7 g Active dry yeast (2 Tsp.)
- 560 g Bread flour (4 Cups)
- 11 g Salt (1 ½ Tsp.)
- 1 Medium Egg (Room temp.)
- 75 g Soft unsalted butter (⅓ Cup)
To brush the bread before baking
- 1 Egg
- 1 Tbsp. Milk
Instructions
- In a container add milk, water and sugar. Mix.
- Add the dry yeast, stir and let stand 10minutes until the yeast has activated.
- In the mixer bowl add the flour and salt, mix.
- Add the egg, butter and the mixture of milk, water and yeast.
- Knead first at low speed until all the flour is hydrated.
- Then raise the speed to medium and let it knead for approximately 15 minutes.
- Transfer to the work table and shape the dough into a ball. Try not to add additional flour.
- Then transfer the ball of dough to a greased bowl, cover and leave to rest in a warm place for an hour or until doubled in size.
- After resting, grease your hands with a few drops of vegetable oil and transfer the dough to the work table.
- Knead for 2 minutes, roll into a ball and divide into 12 equal-sized portions.
- Shape each portion of dough into a ball (see notes).
- Transfer the dough balls to a greased baking sheet. (See notes)
- Cover with plastic wrap and let rest again for 1 hour or until almost doubled in size.
- Preheat the oven to 170°C or 338°F.
- Remove the plastic wrap from the buns, brush with the egg and milk mixture.
- Bake in the preheated oven for approx. 22 minutes or until fluffy and golden on top.
- Remove from oven and let rest for at least 25 minutes before serving.
Notes
And these delicious rolls will be ready. In addition to being perfect to accompany the main dishes of your meals, they can also be eaten by themselves with savory or sweet fillings according to the consumer’s taste.
These rolls are best fresh, but if there are any left over, once they are completely cool, they can be stored in a plastic bag or airtight container so they don’t lose moisture.
I hope you liked the recipe.
If you prepare this delicious recipe for milk bread or milk rolls for lunch or dinner, I would love to know about it and see your photos. You can send them to me via Instagram or Facebook to @lovefortheoven.
Legal notice: This page may contain affiliate links. I may receive a commission for purchases made through these links. There are no additional costs for you. Where, when and how you buy a product, of course, is up to you alone.
Thank you very much for reading this far and see you in the next recipe.
You might be interested in:
https://youtu.be/9zM5MTjRDUM
https://youtu.be/a0qvIqTUbeg