
Delicious sponge cake made with hot milk. This procedure is new to me, I did not know this type of sponge. It is from the family of sponges like a genoise, where the eggs are beaten until they increase in volume, but with the addition of milk and butter we can add flavor and moisture to the sponge cake and it makes it more tender and very tasty.
Details to take into account
The process for making this cake is quite unique. Generally, I make my biscuits either with the creaming method when I use butter and if it is an oil sponge, I usually use the “quickbread” method where the dry ingredients are mixed on one bowl and the liquid ones on another. In the case of this hot milk sponge cake, the eggs are beaten in the style that would be done when preparing a light sponge cake, but the proportion of ingredients is different not only because of the addition of milk and butter, but also because of the amount of eggs relative to the other ingredients you need.
Overall it is an easy cake to make. As the name suggests, the recipe adds hot milk to the mix, but it’s not just this ingredient, the butter also melts into the milk as it heats up. It is important that the milk is not boiling, and therefore it should be heated at medium low temperature and allow the butter to melt little by little. Then, to incorporate these two ingredients into the rest of the mixture, I preferred to continue beating and not add it all at once to reduce the risk that it could affect the texture of the eggs and start cooking them ahead of time.
Speaking of eggs, for this recipe you work with them in a similar way as when making a Genoise sponge cake. The eggs together with the sugar and the vanilla are beaten at high speed until they fluff and take on a viscous and pale consistency. I always recommend for these types of batter that the eggs be at room temperature and that they be used as fresh as possible. In my experience, eggs fluff up more and stay more stable when they have both of these characteristics. I usually buy the eggs for this type of biscuit, if possible, the same day that I am going to bake it.
One last detail regarding the butter is that I have used unsalted butter for this recipe and I have added the salt separately to be able to control the amount that the recipe has in total. Different brands of butter have different amounts of added salt, but the margin for error ends up being small, so if you prefer or have easier access to salted butter, you can use that without a problem and omit the salt called for in the recipe. Similarly, you can use margarine instead of butter if you prefer, keeping in mind that there will be subtle changes in flavor and texture.
As for the wheat flour, I’ve used an all-purpose flour that doesn’t contain baking powder because just like with the salt, I like to control how much I add. When adding it to the rest of the mixture, you have to try not to beat too much or too energetically so as not to generate a lot of gluten in the flour and then the cake ends up being dense or hard. Only beat what is necessary so that it is integrated with the other ingredients and all is hidrated, then you stop. This is also so as not to jeopardize the texture that was worked on when beating the eggs. In fact, if you feel that your mixer beats very quickly even at the lowest setting, you can integrate the flour by hand with folding it in with a spatula. It is also important to sift it to reduce the possibility of unmixed flour clumps remaining in the final product.
I have baked this mixture in two 15cm or 6 inches baking pans. The important thing is to distribute the mixture equally in the two molds, so that both sponges are ready in the same baking time and are of the same height. This in turn helps to make the filling and subsequent assembly of the cake easier.
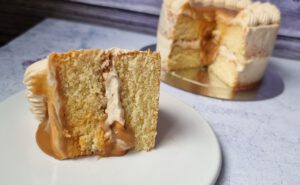
I believe that although this cake can be eaten well on its own, it benefits more from being accompanied by a filling or syrup that provides more moisture. In this case I decided on a filling of dulce de leche and whipped cream. Depending on the brand, it is possible you find Dulce de leche with thicker consistencies than the one I have used, so you can decide whether to fill it and cover it only with this ingredient or if you also include the whipped cream. The decoration is completely personal and you can do it to your liking, but in the recipe video I have shown you step by step how I have done it.
And without further delay, the step-by-step recipe:
https://youtu.be/S2bk6rz05Zo
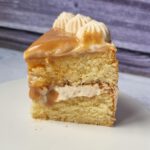
Hot milk sponge cake with dulce de leche and whipped cream
Ingredients
Cakes
- 120 g All-purpose wheat flour (1 Cup minus1 Tbsp.)
- ½ tsp. Salt
- 1 tsp. Baking powder
- 106 ml Milk (7 Tbsp)
- 50 g Unsalted butter (3 Tbsp. + 1 tsp.)
- 2 medium eggs (Room temp.)
- 150 g Sugar (¾ Cup)
- 1 tsp. Vanilla extract
Frosting
- 190 ml Cold whipping cream (¾ Cup)
- 80 ml Dulce de leche (⅓ Cup)
Filling
- 6 Tbsp. Dulce de leche (Approx.)
Instructions
Cakes
- Preheat the oven to 170°C / 338°F.
- Place baking paper at the base of two 15cm or 6 inch pans and grease only the botto (do not grease the sides)
- In a bowl sift the flour, baking powder and salt. Set aside.
- In a saucepan add the milk and butter. Bring to the stove over medium low heat and stir occasionally until the butter is melted and the milk is hot.
- Leave the milk simmeting on low heat while doing the next step.
- In a large enough bowl add the eggs, vanilla and sugar.
- Beat on medium-high speed for 3 to 5 minutes until mixture is thick, pale and has risen in volume.
- Turn off the heat of the milk and butter.
- While beating on low speed, add the hot milk mixture to the eggs batter until fully incorporated.
- Add the dry ingredients in two parts and fold in by hand or at the minimum speed of the mixer. Beat just until incorporated.
- Transfer the mixture in equal parts over the two prepared baking pans.
- Bake in the preheated oven for approximately 20 minutes. (See notes).
- Once removed from the oven, place on a wire rack and with a small spatula go around the edge of the cakes to separate from the pan.
- Unmold onto the wire rack and let cool completely at room temperature. (See notes 2),
Frosting
- Add the very cold whipping cream to a big enough bowl and beat it until soft peaks form.
- Add the dulce de leche and beat on medium high-speed until stiff peaks form and the cream has the right texture. Careful not to overbeat.
- Transfer to a pastry bag.
Assembly
- Place a dollop of cream on the base where the cake will be served and place the first sponge on top, with the flattest side facing down.
- Add a thin layer of whipped cream over the cake and make a border of cream with the pastry bag. (See notes 3)
- Add 2 to 3 Tbsp. of dulce de leche in the center of the cake and distribute until it reaches de barrier.
- Cover with the second sponge leaving the flattest side facing up.
- Add a think layer of cream all over the cake. It does not matter you can see a bit of the sponge, it is a "semi naked" style cake.
- Make a rim of whipped cream on the top of the cake with the pastry bag fitted with an open star tip.
- Fill the center with approx. 3 Tbsp. of dulce de leche (Optional)
- Refrigerate at least 1 hour before serving.
Notes
- Biscuits are baked when they are golden brown on top, have risen in the pan and a skewer inserted in the center comes out completely clean. Do not open the oven until at least 18 minutes of baking have passed. Depending on the oven and the material of the pans, it may take a couple of minutes less or more to be ready, the baking times are always indicative.
- Lightly butter the wire rack where the cakes are going to rest to prevent them from sticking to it during cooling.
- If you wish, you can add simple syrup to both layers of the cake before adding the frosting. The border of cream can be doubled to ensure that the dulce de leche does not spill over the sides.
And now we have a delicious hot milk vanilla cake with dulce de leche to share and enjoy. Ideally, keep it refrigerated for the whipped cream and consume it fresh. The same day or the next day.
I hope you liked the recipe.
If you prepare this delicious recipe for hot milk sponge cake filled with whipped cream and dulce de leche, I would love to know about it and see your photos. You can send them to me via Instagram or Facebook to @lovefortheoven.
Legal notice: This page may contain affiliate links. I may receive a commission for purchases made through these links. There are no additional costs for you. Where, when and how you buy a product, of course, depends only on you.
Thank you very much for reading this far and see you in the next recipe.
Maybe you might be interested in:
https://youtu.be/IxnB-qDbrKc
https://youtu.be/nyTbPFFcoEg