The tres leches cake is a wonderful recipe, very delicious and juicy. In Venezuela, where I am from, it is made in the same container where it is going to be served and covered with meringue, usually Swiss or Italian. However, recently I discovered that in other Latin American countries they make a version filled with fruit and covered with whipped cream, which also does not go in a mold but is presented as a regular layer cake.
For me this was a revelation, since I thought that the amount of liquid in a tres leches cake would make it impossible to present it like this. Not only that, I found out that there are also versions of the cake that are made with different fillings, and I just had to try it.
I did a couple of experiments, I read many recipes, I watched many videos and finally I ended up with the recipe I share with you today. I am more than happy and satisfied with the end result.
Details to be considered:
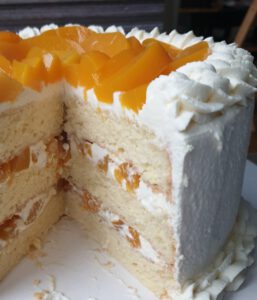
This is a long recipe that takes several steps and processes (it is all worth it, I promise). The first process is to make the sponge cakes for the layers. I have made a cake with 3 layers and 20cm (8 inches) in diameter. I have baked each layer separately to later be able to bathe them in the milk also separately and not have to cut the layers of a full tall cake already with the liquid. It also seemed to me that in this way the distribution of the milk is more uniform.
Now, regarding the process of making a sponge cake or “bizcochuelo” (as we say in Venezuela) I must say that the most important ingredient is eggs. They are the ones that provide the structure and height of the sponge. My recommendations: use eggs as fresh as possible and beat them at room temperature. I always buy the eggs for a sponge cake the same day I’m going to bake it. I have observed in my own experience how eggs that I have had for days do not rise as much or maintain their structure as much or as well as fresh eggs. I know a lot is said about using a very clean container without a drop of fat or impurities, beating whites and yolks separately because in theory the yolks prevent the whites from rising enough, but the truth is that the only determining factor that I have observed by which my eggs rise less is when I use days old eggs at home. In fact, I don’t separate the eggs. The procedure I do for the sponge is inspired by the recipe for the Genoise sponge cake, with the difference that this sponge cake does not contain added fat as the Genoise sponge frequently does.
I always add a few drops of lemon juice or vinegar and a pinch of salt to the eggs when beating them. Not only does this help stabilize them so they rise higher, but it also neutralizes their flavor, so the end result won’t have a very pungent egg flavor. It also helps to add ingredients that give the aroma and flavor that we want for the recipe. This time I added vanilla extract and lemon zest. If you have access to cream of tartar, you can use a quarter teaspoon of this ingredient instead of lemon juice or vinegar, since being an acidic ingredient it serves the same purpose.
The importance of eggs in the sponge cake recipe also explains the absence of baking powder or other leavening agents. The main idea is that the eggs are the ones that give the cake fluffiness and structure. And for this same reason it is very important to beat them long enough to not only generate air in the mix but also to keep that aerated structure stable. Thus the egg mixture must be beaten at high speed for at least 10 minutes, sometimes up to 15. The final mixture must have increased at least 3 times its volume, it should be very thick, has reached what is called in Spanish “the letter point” (which means that when making a shape or letter with the whisk on top of the mixture it takes a few seconds for it to disappear) and it should have a much lighter color than it had when we started to whisk it.
The next step is to incorporate the flours. I use a mixture of all-purpose wheat flour and cornstarch. You can omit the cornstarch if you use pastry or cake flour, since it is a special flour for pastries, that is low in protein, so that it does not generate too much gluten and the cake is soft and fluffy. I do not recommend making it only with cornstarch, as it gives it a different flavor and texture. To incorporate the flours, it is important to do it by hand and use enveloping movements, from the bottom up, so as not to damage the structure achieved during the beating of the eggs and to ensure that the flours are being incorporated well and that there are no deposits of unmixed flour left in the base. of the container. If you should omit the cornstarch, you need to add that same amount by weight on additional cake flour.
To bake these cakes, I recommend using the top and bottom heating option of the oven WITHOUT a fan. My oven at 170°C/338°F bakes them to the right doneness, but each oven is different and, in some cases, it may take longer to bake or it will require a higher temperature. If your oven only heats from the bottom, the temperature should be raised to 180°C/350°F and of course you must watch the cakes as the baking times will vary. DO NOT open the oven door during baking. If the cakes puff up well in the oven but collapse completely when you take them out, it may be that they needed more baking time or a higher temperature. Important: if the cakes do not turn out well, it is not worth continuing with the rest of the recipe. It is preferable to start over and do the sponges again.
As soon as the cakes come out of the oven, they are bathed with the milk mixture, ensuring that each layer receives the same amount of liquid. Although the recipe is called “tres leches” I use a combination of four dairy products: evaporated milk, condensed milk, heavy cream (also known as whipping cream) and whole milk. In total, one liter of this mixture is made. If you don’t want to use whole milk, you can do it by mixing the other three milks in greater quantity until you get 1 liter or four cups in total.
The cakes are then left to rest until they have cooled completely. They are covered with plastic wrap and refrigerated (not frozen) until the next day.
The next day the cream is prepared to cover the cake. In this procedure there are also important things to consider. First, we are going to use Philadelphia cream cheese to help stabilize the cream. Also, the heavy cream (or whipping cream) should be cold from the fridge. If possible and if you have space, you can place the mixer bowl and the whisk attachment in the fridge for half an hour to 1 hour before whipping the cream. I also add a powdered “cream stabilizer” that I buy under that name here in Germany, the brand is San-Apart. But if it is not possible for you to get it, you can omit it or substitute 1 tablespoon of cornstarch. However, some brands in the US already come with some stabilizing agents in their ingredients, so you can check the ingredient list of your heavy cream before having to search for San-Apart.
And once the cream is has reached firm peaks, we can proceed to assemble the cake. For this, I highly recommend watching the video of the recipe (linked below), so that you can see the process step by step and also take into account that the decoration is only a suggestion, you can vary it to your liking.
So now, the recipe:
https://youtu.be/X415i16XQuM

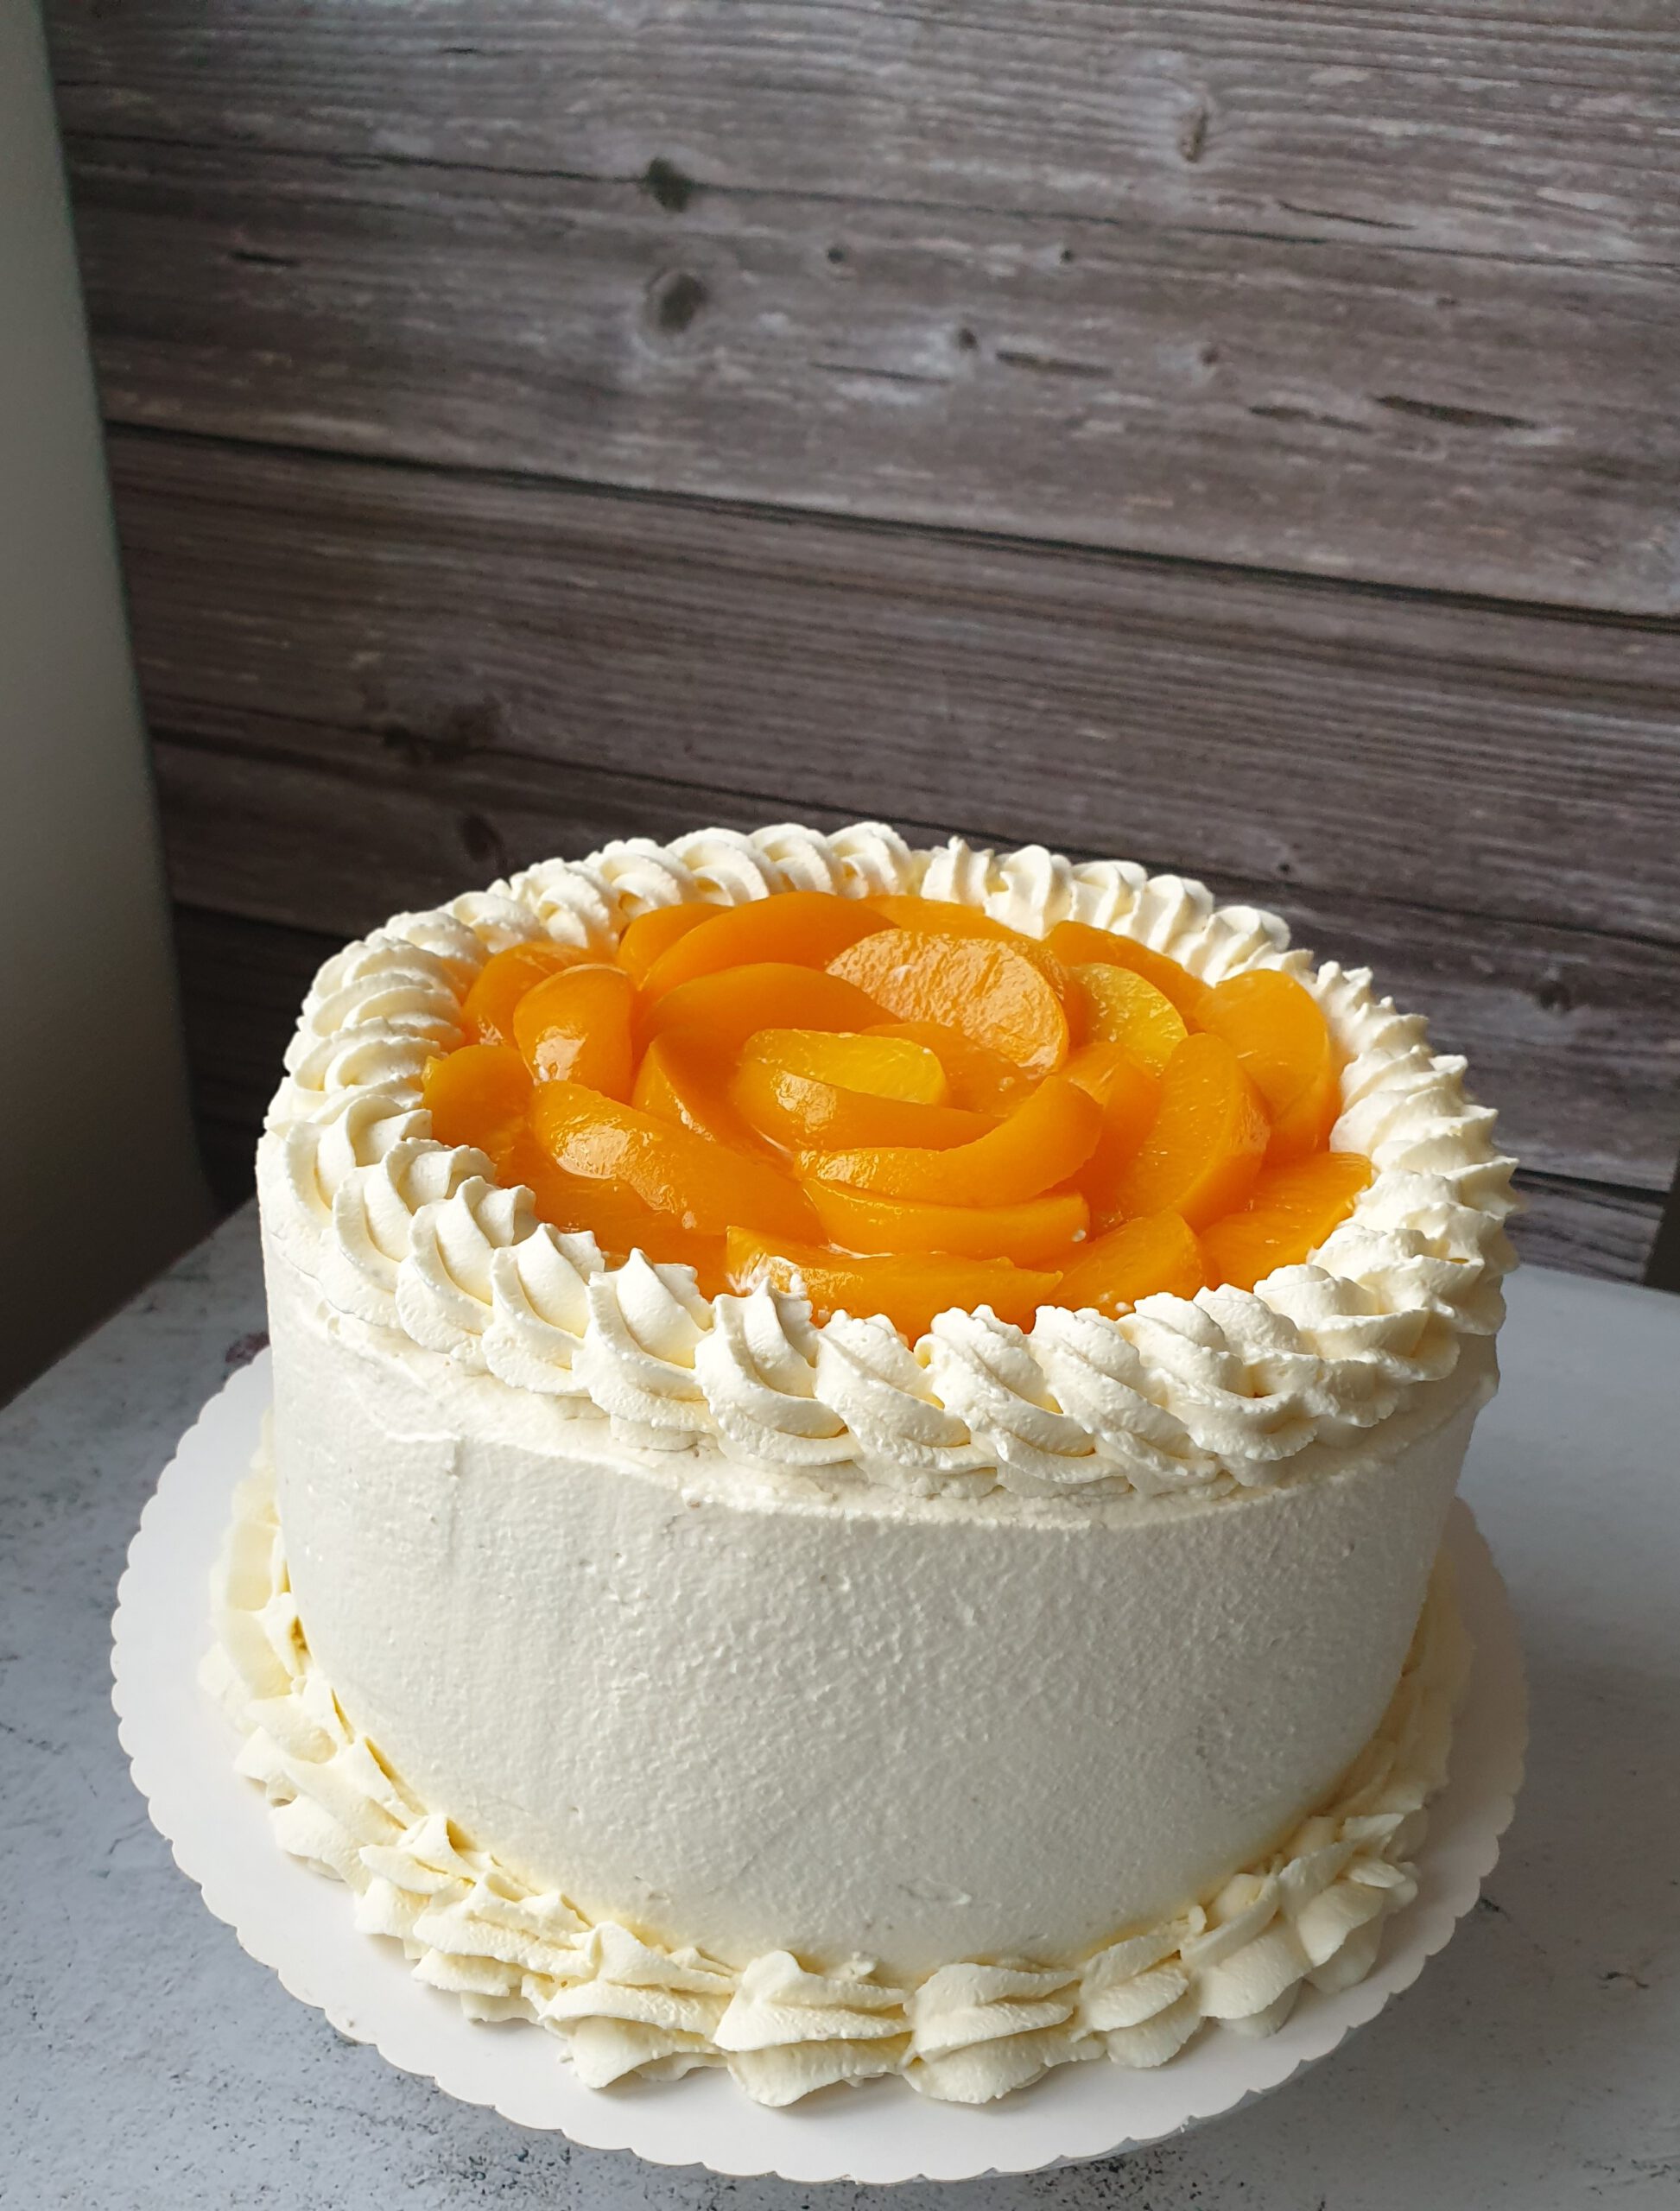
Tres leches cake filled with peaches
Ingredients
For the cakes
- 7 Medium size Eggs (Room temperatura)
- Tsp. Vanilla extract
- Lemon zest
- 210 g Sugar (1 Tza. + 1 Tbsp.)
- ½ Tsp. Lemon juice
- ¼ Tsp. Salt
- 140 g All-purpose flour (1 Tza.)
- 70 g Cornstarch (¾ Cup)
Milk mixture
- 250 ml Evaporated milk (1 Cup)
- 250 ml Sweetened condensed milk (1 Cup)
- 250 ml Heavy whipping cream (1 Cup)
- 250 ml Whole milk (1 Cup)
Frosting
- 340 g Philadelphia cream cheese (12 oz)
- 150 g Sugar (¾ Cup)
- 1 Tsp. Vanilla
- 750 ml Cold heavy whipping cream (3 Cups)
- 4 Tsp. Cream stabilizer (San-Apart) Optional
Fruit
- 800 g Canned peaches 24 oz
Instructions
Day 1 - Sponge cake and milk mixture
- Preheat theoven 170°C / 338°F.
- Sift the flour and cornstarch into a bowl. Mix briefly and reserve.
- In the mixer bowl add the eggs, vanilla, sugar, lemon zest, salt and lemon juice. Beat first on low speed until combined, then beat on high speed for 15 minutes.
- Incorporate the sifted flours by hand in three additions, with enveloping movements so as not to lower the air in the mixture.
- Transfer the mixture to three 20cm (8 inches) baking pans lined with baking paper in the base.
- Bake for approximately 25 minutes. They're ready when they're fluffy and golden brown and a skewer inserted in the center comes out clean. Do not open the oven before the 25 minute mark.
- Freshly removed from the oven, run a spatula along the sides of each pan to loosen the sponges. Prick the sponges with a skewer or a fork.
- Mix the 4 different milks in a bowl until well incorporated.
- Bathe the still hot cakes with 300ml of milk mixture each. Refrigerate the remaining 100ml for the next day.
- After bathing the biscuits in milk, let them rest at room temperature until they cool completely.
- Cover them with plastic wrap and refrigerate until the next day.
Day 2 - Frosting
- For the frosting, start by briefly beating the cream cheese until completely smooth.
- Add the vanilla and sugar and beat until incorporated.
- With a spatula go around the bowl and make sure that everything is well incorporated.
- Continue beating and gradually add the 3 cups of heavy cream, which must be cold.
- Add one by one the teaspoons of cream stabilizer, if used (see notes)
- Gradually increase the speed and beat until the cream is whipped and reaches stiff peaks.
- Transfer part of the topping to a pastry bag.
Day 2 - Assembly
- Cut 400g (14oz) of the peaches into small squares and the rest into slices. (Half of the can)
- Place a little frosting on the cake board (see notes)
- Remove the first sponge from the fridge, remove the plastic wrap, unmold and remove the baking paper that had been placed on the base.
- Place the sponge on the cake board with the flattest side down.
- If necessary, brush the cake with part of the remaining 100ml of milk from the previous day.
- Then put a thin layer of whipped cream on the cake and with the pastry bag make a border of cream around the circumference of the cake.
- Add diced peaches over the sponge. Fill gaps with a little more whipped cream.
- Unmold the second sponge following the same instructions as the first.
- Place on top of the first filled sponge cake with the flattest side facing up.
- Repeat the brushing process, whipped cream, barrier and peaches.
- Unmold the third sponge in the same way as the previous ones and place on the cake with the flattest side up. Check that the cake is level and straight.
- Spread a thin layer of frosting over the entire surface of the cake (top and sides) and once achieved, refrigerate for 20 to 30 minutes.
- Then add another layer of frosting to the cake, but this time a thicker layer that covers the entire cake well. Refrigerate 30 more minutes.
- Put all the remaining frosting in a pastry bag with an open star tip (Wilton 1M, for example)
- After 30 minutes decorate the cake to your liking with the rest of the frosting and the peaches.
- Once the decoration is finished, refrigerate at least 4 hours before cutting and eating.
Notes
Once the 4 hours have passed (at least) this delicious dessert will be ready to enjoy and share. It is a fresh and delicious dessert option. It is important that it is always kept refrigerated and that it is placed, if possible, on a concave plate or base that does not allow the milk that seeps under the cake to spill.
I hope you liked this recipe and are encouraged to prepare it. I loved experimenting with it and really getting a taste of this tres leches delight. It should be noted that it can be filled with other types of fruit, for example strawberries, raspberries, blackberries or a combination of them. It can also be made with kiwis, or with a fruit cocktail.
If you manage to prepare this delicious stuffed tres leches cake, you can send me photos on Facebook or Instagram, my username is always @poramoralhorno. It always makes me so happy to see your photos.
Thank you so much for stopping by and I hope to see you in the next recipe.
Legal notice: This page may contain affiliate links. I may receive a commission for purchases made through these links. There are no additional costs for you. Where, when and how you buy a product, of course, depends only on you.
You might be interested in:
https://youtu.be/JoNKMHMGqls
https://youtu.be/I_C4-dPQBIY
Ellen Langfitt
Love this recipe. I originally found it on YouTube but now your channel is gone. So thankful to find it again. I made it for a customer and he said it tasted just like his abuela used to make for him.